
By now we probably all have a love-hate relationship with the Orton effect. It can be overdone for sure and it’s not a subtle adjustment, but I still like using it for certain photos even if I don’t use it often.
It’s a method of blending layers in Photoshop, but it started out as a film technique using slide film to create internegatives. At least that’s what I assume Michael Orton did. One slide was overexposed and out of focus and the other underexposed and in crisp focus and they were placed one directly over the other. The result was a photo with rich, deep color and a glow created by the furze in the out of focus slide. The level of glow or crispness was all in the original transparencies, but now that we’re in the age of Photoshop, it’s a much easier effect to create and to modify. Plus you can do it with one shot.
The overall softness and boost in color of the Orton effect is a finishing touch for me in my workflow. Often it comes when I just can’t achieve the final look with all the other adjustments done. Usually it’s when I want a less documentarian look and one that is more artistic or emotional. But sometimes it’s still too much.
Then I discovered Edge Masks in the TK8 Multi-mask panel. What Edge Masks do is allow you to protect or emphasize the crisp edges of objects in your photo. When applied to an Orton Effect Group in Photoshop, it brings back detail, but still allows much of the softening and glow effect to be prominent.
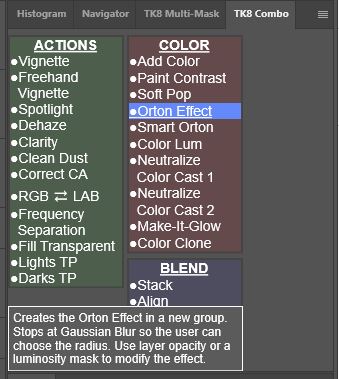
Run the Orton Effect from the TK8 Action panel – I just leave it at the standard 10 pixels and layer blend mode.

The Edge Mask Panel 4 control buttons –
Top left – expands pixel selection
Top right – contracts pixel selection
Bottom left – iverts mask
Bottom right – blurs mask
Underneath are the standard mask modification buttons in gray and the output buttons in black.
To keep your edges crisp –
- Create Edge Mask by clicking the Tulip Icon
- Expand to 3 pixels (more will protect more edge, fewer will protect less edge)
- Add a blur 3 pixels as well (the blur will smooth the transition between crisp detail and the soft Orton effect)
- Refine mask using levels or whatever modification tool works best to make sure you have nice crisp edges highlighted
- Invert the mask – this is key – now your edges should be in black, protecting them from the Orton effect – everything in white will get the full effect, shades of gray get amounts on a sliding scale based on the level of gray
- Use a white/black/gray brush to further adjust the mask so you get the OE where you want it and in the right amount
- Output to the Orton Group in the layer stack
- Adjust layer opacity and or fill to taste
Here is what an edge mask looks like when you create it and then when you invert it –


Like any other mask in Photoshop – the whitest areas will get the most effect from the adjustment, the blackest areas the least. So you see the tight selection on the left creates the tight protection on the right.
Here’s the photo with the Orton effect and the crisp spines –

And here it is without the Edge mask –

What a difference!
After working with these shots of in shadowy sunlight, I added the Orton Effect, but didn’t like what it was doing to the texture of the leaves and roots. That’s when I thought of the Edge mask and it works beautifully.


Well I hope that wasn’t too much. The TK8 Plug-in Panels are something new for me and I’ve barely scratched the surface with them, but they do make life with Photoshop a little easier. Mostly in the fact that many of the things that are complicated to do are made simple, or at least simpler. And that there is some overarching organization in the panels that is seriously lacking in Photoshop. When I decided to put my toe in the Photoshop pool, one of the things I had to decide on was which learning curve – the application itself or this plug-in. After a while it was an easy decision. I’ve discovered so many great techniques that are easier to understand and execute using the plug-in.
As I run into more stuff to do and cool techniques, I’ll pop them in for a quick tutorial. Have fun!

Leave a comment