
I’m writing this today, May 24, 2023 and yesterday I updated Photoshop. There are some new tools there that I’ve been experimenting with and wanted to show how I’ve incorporated them into my work. I mean the release version of Photoshop (v. 24.5.0), not the Beta although one of the tools I used is in Beta, but can be downloaded within the release version. Confused yet?
Basically, here’s what I used –
- Delete and Fill (right mouse click with selection)
- Contextual Task Bar (totally new feature)
- Content aware fill (with selection)
- Remove tool (new in tool bar)
- Neural Filters
- Depth Blur (Beta download in release version)
I didn’t use Generative Fill which is only available in the Beta version of Photoshop. It uses the same Contextual Task Bar as it now exists in the release version, but will harness Adobe Stock to create AI-generated fills and additions to your photos. The upshot is that you can make anything appear or disappear in your photo almost like magic. It takes place in Adobe’s cloud so your computer doesn’t have to do all the work, but you (obviously) need to be connected. Using Adobe Stock means that copyright will be honored and the creators paid for the bits their original work generated for everyone else’s photos. Those photos will be legally eligible for commercial use so getting that perfect photo of a house for sale or a busy theater’s sidewalk will be possible and legal to use in ads, etc.
But what about nature photography? Same goes, but I think it adds more wrinkles to what people will consider natural and authentic. We’ve been wrangling with this ever since Photoshop came into existence, but the new AI-driven tools will disrupt things even more since they are so much easier to use and produce much better results. There is talk of a credit or point system that comes with your Adobe subscription that will track the number of times you use the feature, but for now you can re-generate AI fills as much as you want. You can even use them to add to canvas to pretty much infinity. But as I said, I haven’t used that to edit the images in this post. Maybe when it’s fully released I will, but for now the local, non-cloud-AI-driven tools serve adequately and here are a couple of examples –

Probably a male Trumpeter swan guarding his territory while I drifted closer to him in the kayak. A nice enough photo and I quite like it. Here’s what it looked like before I got it into Photoshop –

To be fair, a lot of that clean up can be done in other apps including Lightroom, but it was so much easier in Photoshop. I mean, really easy. A couple of clicks easy. Not a lot of futzing or fiddling to get things looking natural. One of the methods I have used to get this kind of blur in front of and behind the bird was time consuming, tricky to do and had a lot of steps. Not anymore (and if you still say that in your best Clousseau voice, my hat is off to you).
Another example of the same swan –

The light was a bit filtered by clouds for that one, but I nearly blew out the highlights. Using an Adobe Color profile at the start in Lightroom did just that, but switching to a Linear Profile for my G9 flattened the curve and revealed that, no I did not blow the highlights and that there is actually quite a bit of detail in those feathers. If you’re not familiar with Linear Profiles, click here through to Tony Kuyper’s website for an explanation and to download one for your camera. If one doesn’t exist, he will make you one. He did for me.
Here’s the shot just before sending it to Photoshop –

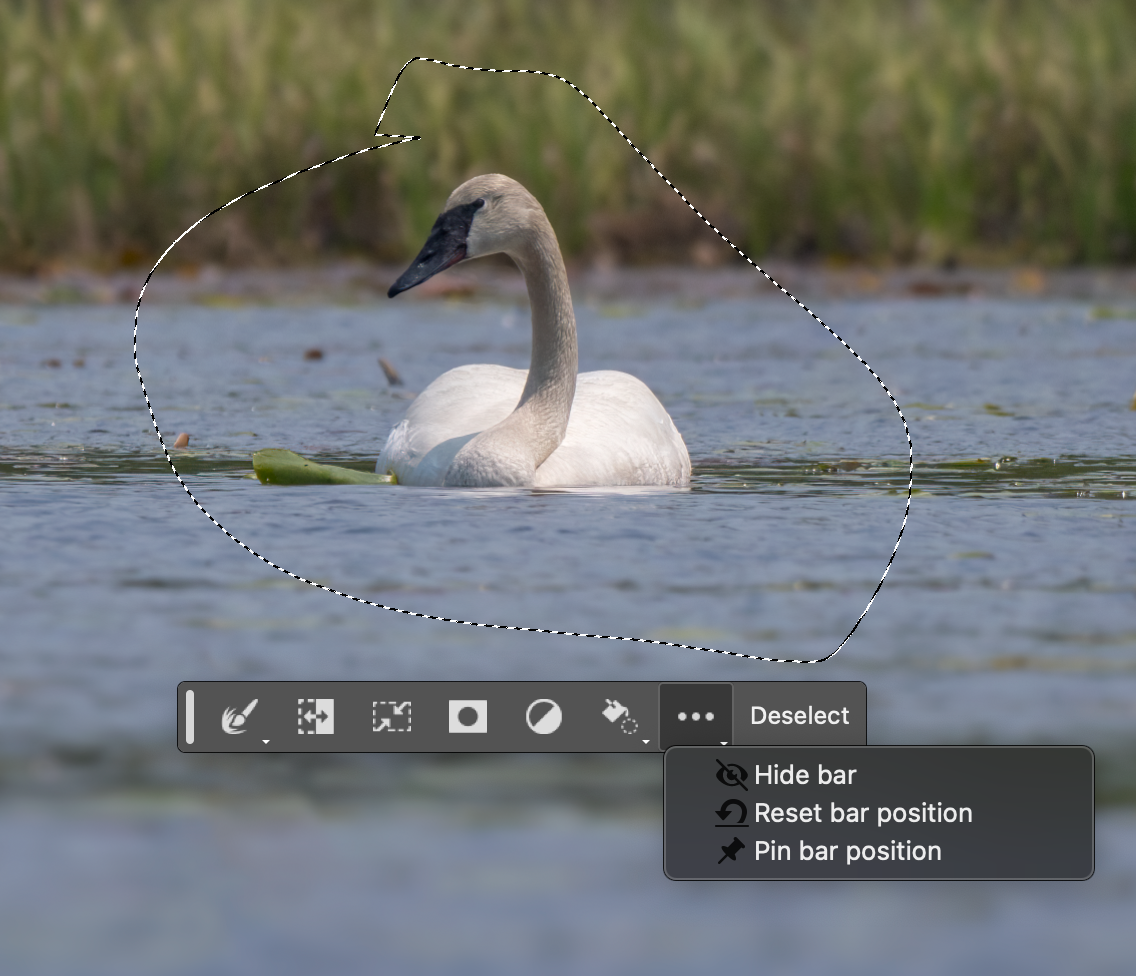
It is a big change and looks like a lot of work, but it really didn’t take much time at all. For most of it I used tools associated with the new Contextual Task Bar which pops up on screen and is turned on by default –

At first the bar looks like this and is at the bottom of your photo, but can be moved and pinned anywhere you want. It moves around on its own so you’ll have to work with it to decide what you like.
The Contextual part means the options change depending on what tool you are using and it’s exciting to think of what will be added down the road. For example I’ve made a selection with the Lasso tool and it changed to this. The buttons from left to right –
Modify selection – invert – transform – create mask from selection – create new adj. layer – Fill selection – More options and obviously deselect which is very handy.


The tiny white triangle in the lower right corner means the tool itself can be expanded or altered like it does in your regular toolbar. Here’s a look at the dropdown for the Modify Selection tool – convenient.
And the other two drop down menus look like this –

The idea of a floating toolbar that can be positioned anywhere on the screen is a welcome one, but it automatically appears just below your selection so it is pretty convenient as is. Using any selection method makes the Contextual Task Bar come up and clicking deselect makes the original one come back in its default position or wherever you pin it. I haven’t decided if I’m going to do that or not. I also wonder if they will add Delete and Fill to the options dropdown which only has Content-aware right now. And it’s the automatic version of that tool, not the expanded one with all the other controls to select where it fills from and other parameters. That is still available from the usual places.
So the upshot is that removing distractions is easier than ever and now we can generate AI created content to replace or introduce things into our photos.
What does this effortless ability mean for nature photography? Well it’s going to mean a lot and will ultimately be defined by each photographer. I’m sure that many contest rules will become stricter in terms of what photo manipulation will be allowed. Publications and other outlets that involve nature and wildlife photography will demand certain levels of transparency from contributors. Unlicensed AI-generated content will be issues and probably a whole new crop of lawyers will grow up around it.

I’m still going to approach photo manipulation as if I was a painter. That is, if I were to paint from life or paint from a photo, would I leave in all those stumps and branches in those swan images? The answer is no. I wouldn’t. And I’d reverse him as well – for left-to-right readers it’s a more natural perspective and engages us more immediately. There is more ease with the flow if things point this way and so I’ll still do it where it makes sense. Ditto with the additional blur I created with the Neural Filter. My lens was as wide open as it could be, but the swan was closer to the background than to me so that part was more crisply focused than I wanted. To me it’s all just interpretation, like lifting my mid-tones or raising the blacks to make things softer. Plus the effect I achieved is what you’d get with an 800mm f/4 lens, and who wants to carry that around?!

I could have nearly gotten the same look by using various denoise and sharpening tools anyway. For the swan photos I blended layers in Photoshop – one with a Topaz Sharpen AI image which left the background looking all weird, and another using the DNG Lightroom makes after its denoise operation. The bird had better detail in one, but the background was better in the other so blending them was a natural solution. More work, perhaps, but the time saving with all the distraction removal and the Depth Blur is a nice trade off. At least for me. As I’ve gained experience with all the software I use, I don’t have to guess or adjust nearly as much and so even complex tasks take far less time than they used to. So if you’re a beginner or new to certain software programs or tools, just keep using them and experimenting – you’ll be quicker with seat time.
