
In the post about Subject Masking in Bird photography, I mentioned that I used a technique in Photoshop to blur a background while preserving the detail in the subject. I’ve used it once more and so decided to write a quick tutorial about it.
Here’s the shot as it came from Lightroom and Topaz Sharpen AI –

And here’s how it looked after I was done in Photoshop –

Isn’t that cool?
In this case the technique gives the appearance of having taken the shot with a wider aperture by using Tilt-shift blur in the blur gallery, but you could substitute other blurs depending on your needs. Here are the steps you’ll need to take –
- Duplicate background layer and rename to foreground or subject or something so you will be able to identify this layer in the stack
- On the background layer, select your subject using any selection tool you prefer
- Expand that selection by 5 or so pixels by going to the Menu bar – Select-Modify-Expand
- You should have a gap between the exact edge to the marching ants, this will be useful for blending and reducing halos
- Remove object with Content Aware Fill (Edit menu)
- Only the edges of the fill job really counts here, if the center is weird, don’t worry because you’re going to be putting the object back in its place later
- Output to a Duplicate Layer (Background copy)
- Enable foreground layer and disable two background layers
- Your selection should still be active
- Apply foreground layer to the background layer by clicking the layer mask button
- With layer mask selected go to the Menu bar Filter-Other-Minimum (you can reactivate the other layers now – if you leave them off, you will have a blank pixel layer with the object floating in it)
- Contract the mask by the # of pixels you used to expand your selection
- You can use whole or fractional pixels and sometimes contracting by .5 to 1 pixel will tighten even more to eliminate any halo effects
- Select background copy layer and convert to a Smart Object
- Go to Filter – Blur gallery and select Tilt-Shift Blur for the effect in this shot
- The tool has three main parts – the center to 2 solid lines – this is where everything will remain sharp, the solid lines to 2 dotted lines – this is where the blur will blend into the area beyond the dotted lines where the maximum blur will be placed.
- By placing these lines within the photo, you will preserve the crisp focus nearby to the subject, like the branches a bird sits on or the place where a person stands
- By adjusting the solid and dotted lines, you can expand or tighten the crisp focus and blending areas to the intense blur
- Because you have a mask only the background will be affected
- Because it’s a Smart Object you can open the Blur tool to adjust as needed
- Go to your layer mask and with white and black brushes, refine the mask
- White will paint more of the blur onto the photo, black more of the subject
- Use low opacity and fill for the really tight, tricky parts, higher opacity and fill for larger areas that don’t need precise feathering
- If you want to use the mask again in a new adjustment layer, create the layer and Alt click and drag the layer to copy it. Invert to adjust the background.
My layer stack looked like this –

Phew! I hope that was helpful. For fussy subject masking, the CAF works great and by first expanding your selection and then contracting your mask, you can eliminate awful halos around your selection. I remember fighting with a shot of an Eastern Kingbird this summer. It had a very busy background that I wanted to blur, but the masking was brutal and a giant PITA. This is much easier even though it involves a lot of steps. The result looks much more natural, too.
So after working with a couple of folks who used this tutorial and got a bit confused with a few aspects, I’m back to update with some screen shots to clarify some things.
After completing step five and disabling your background layers things will look like this –

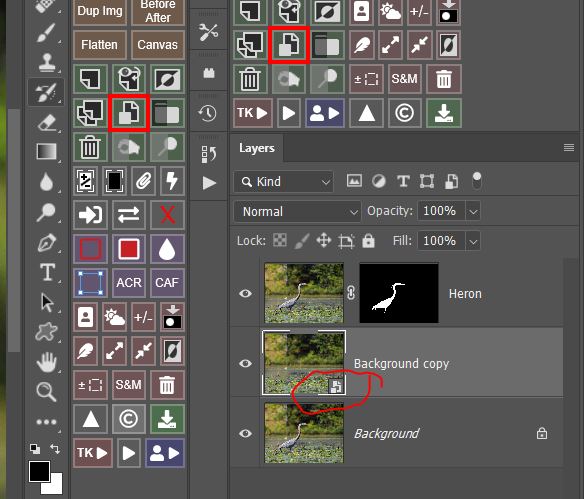
The selection is still active – marching ants on the photo and the rainbow frames on the TK8 combo or cx panels. Now click the layer mask icon

When you apply the mask it will look like this –

See that the two background layers are still turned off? That means the black area in the mask layer is blocking everything in the photo except your subject selection.
To select the layer mask itself for step 7 click on the mask in the layer, not the layer itself. When you do a white frame will appear around it –


When you turn your Background copy layer to a Smart Object you will see an icon in the corner of the layer photo like this –
If you’re using the TK8 plugin, you will see the Smart Object button framed in red as above.
Here’s a look at what the Tilt-shift blur tool looks like – the center line to dotted lines and how I put that center where the bird is standing to keep that part of the background crisp –

In this shot, I have the solid line above the center point too low – I need to move it above the taller grasses to keep them from being blurred. Everything from the solid to the dotted line will have a gradual blur and everything above the dotted line will have the maximum blur that I’ve set. Because the blurred foreground is so close to the edge of the photo, the dotted line is off the frame entirely.
Phew! Hope that makes more sense and things are a bit clearer.

I just found this tutorial and am wondering, seeing you use TK8, if there is an “easier” way to do the selection and blurring using the TK8 Panel? Thank you in advance!
Hi Laurie – I haven’t found one other than using some of the buttons built in, but I can take a look and see. Some of the improved selection tools make that easier than before, especially for subjects without fur or feathers.