
Recently I spent a few days in and around Prescott, Arizona. For one of those, I went out with two fellow photographers – Ted Grussing and Diane Miller – Ted was generous enough to drive down with his boat and take us out on Lake Pleasant for some bird and wildlife photography. In addition to coming away with some cool shots (I can’t believe how lucky I got), I took advantage of the Masking Tools in Lightroom – specifically Select Subject. So like I did with the Fall Photography post, I’ll wrap some tutorial stuff into this one because SS gets a little weird depending on how you use it. Understanding its idiosyncrasies is worth it because it is a huge time saver for creating Local Adjustments.
First up, some Western Grebes –

Aren’t they gorgeous? There were hundreds of them flocked together in different parts of the lake and were pretty used to boaters, only diving out of the way when we got close. None of these shots are huge crops and I’m pretty happy with what I got, although I wish I’d been able to get a shot of one swimming toward me instead of by or away. Check out those eyes! I used Select Subject masking to adjust both the background and the bird itself for maximum cuteness.

For the most part, Select Subject does a really good job. Occasionally if the colors, sharpness or luminosity values are very close between the subject and the background it will include more than you want and you’ll need to use the Subtract button to remove those parts. The reverse also happens and you will need to Add more to the area you want to select. A brush tool is usually the best way to do this. You can vary the size, feathering, flow and density of the brush strokes to be precise and careful with your edits. Clicking the Alt or Opt key changes the brush into an eraser if you went too far.
As I did with the grebe photos, you’ll often want to work the subject and the background separately. The fastest way to do this is to copy the SS Mask to a new one and then Invert it. It works, but if you’ve made Add or Subtract alterations, those can get wonky with the Inversion. Start by right clicking on the Mask Group and choose Duplicate – the Mask and all sub-masks will be copied. Next right click on the Subject sub-mask and choose Invert. The first thing you’ll notice is that any Add or Subtract changes come across the way you applied them the first time. They do not invert with the Mask they affect. I told you it was weird. Here’s an example of what I mean –
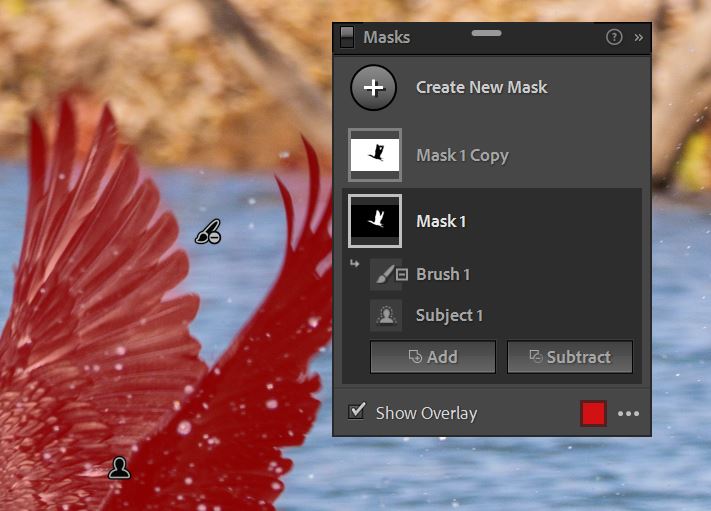

What you see here is the Select Subject Mask on the left and the Brush tool I used to remove part of the background between the wings that Lightroom included as part of the Subject. On the right is the same Mask copied and inverted to select the background. It does not include the bit of background that I painted out in the first mask even though it is appropriate for the Background Mask. Does my explanation make sense?

There is an easy way to fix this –
- Copy Mask and Invert as normal
- Right click on each sub-mask and choose either –
- Convert to Subtract
- Convert to Add
For some unknown reason Adobe thought it was a good idea to have to manually invert each sub-mask.

You can see that the menu defaults to the opposite of what the brush was used for originally and will save you having to do any complex, fiddly or time-consuming refinements all over again. The sub-masks work just as they should and you can keep refining the Mask as needed.
Just one more beauteous grebe –

Ted continued to show us the lake and hopefully find more birds. Soon I spied a gorgeous (and quite dark) GBH, first up on a cliff and then down on the shore where it landed, unfortunately only to be chased off again. But its aggravation was my reward, check it out –

A take off shot! And it’s in focus! Will wonders never cease. I started photographing the bird as soon as the boat was still enough to allow it and so kept on shooting as it walked to the edge and flew. The Animal Detection and Continuous Autofocus in the G9 did a really good job, but it was pretty easy because of the clear blue sky behind. Would it do just as well with a different background? Stay tuned. We followed it to where it landed and that shot is another good candidate for using Select Subject and the inversion.

For this image I started with Select Subject and it did a great job picking out the heron – feet and all so I didn’t have to modify the Mask. After making that adjustment I copied the mask and inverted it to select the background. I wanted to bring up the orange color in the rocks so I chose Intersect With Color Range and used the eye dropper tool to select a section by dragging to create a square.

By making a square for your selection, you get a range of colors. Using the eyedropper without making a square chooses a single color for a more narrow selection. You can further refine the Color Range with the slider – going left restricts and contracts the colors selected and to the right expands them – basically it’s a bleed or a feathering effect. You can also use the eye dropper to reselect the color if it’s not doing what you want. The overlay function often helps you visualize what areas of the photo will be adjusted. By refining the mask, I got a nice layered look to the saturation behind the bird. Mask 2 in the list is a little brush work to lighten the face.

And here it is just seconds later –

Another take-off shot!!! And it’s in focus, too! Even with a super-busy background, the Animal Detection and Continuous Autofocus stayed on target as I panned and shot in burst mode. Holy crap!
Ahem…sorry. But hey, I absolutely love that I got it. And even better, I knew how I could improve it.
To get the final result for that photo, I used Photoshop to Mask the bird and blur the background. It was a pretty involved process and took me four tries, but I finally got it looking natural. It’s pretty fiddly to paint the mask by the feet and some of the feathers in the wings and it took a long time relatively speaking. If you don’t have Photoshop or don’t feel like you want to attack that learning curve, you can achieve something like it in Lightroom with masks. Here is an alternative take on the standing heron –
Using the same Inverted Select Subject Mask, I pulled down clarity, texture and sharpness –
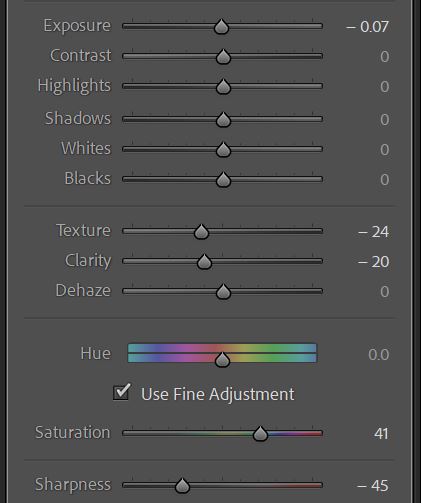

Doing this can help a subject stand out against a busy background. Which standing bird do you prefer?
While cruising around looking for more subjects, I spied this red-tailed hawk posing beautifully and then off it went. Three take off shots in one day! Unreal.
These two didn’t get much Lightroom work, but I did use Topaz Sharpen AI to bring up detail and Photoshop to remove some distractions (basically pruning a big branch).


This miffed egret took off, too, but I missed it. We’d chased it up onto this cliff and we all really liked the look of it so snapped away. Luckily all mirrorless cameras so it was remarkably quiet in the boat. I brought this one into Photoshop because I needed to clone out a distracting rock in the shadows, so while I was in there I used some Luminosity masking to further massage the tonal range in the photo. It’s not quite as sharp as it could be, but the newest version of Topaz Sharpen AI keeps crashing on me every time I use the Masking function, which is needed here so I don’t sharpen the cliff face. Oy vey.

We found cormorants, too. Such striking birds with really interesting behavior. Diving and swimming. Paddling and posing with outstretched wings drying in the sun. This first shot was frustratingly difficult to finish processing in Lightroom even with the Masking function. I knew I’d want a blurry background, but I wanted to keep parts of the perch in focus. That required Photoshop and the same blur technique I used for the flying heron, only this time I used a Tilt-shift blur instead of Gaussian. It allows you to make it look like you shot with a wider aperture than you did. It’s an amazing tool and one I’m glad I learned about for this image. It’s a huge crop so excuse the lack of detail.

Don’t you just love those eyes?

And OMG – another take-off shot! I just may be a bird photographer after all.

This one went into Photoshop to use Frequency Separation to paint over a very distracting shoreline in the distance. I don’t use this tool often as the Clone Stamping and Healing Brush tools usually do what I want. Even Content Aware Fill didn’t do the trick, so Frequency Separation to the rescue. It’s a process of first separating the color and the texture of an image into two layers then selecting one and painting to the other. For example if you like the texture in your shot, but not the color you can paint new color over the existing texture by sampling an area of color you want to use. And the other way as well and that’s what I started out with – painted the color of the water over the vegetation on the shore. Then I did the reverse and painted the texture of the water in most of the same areas. I did a little clone stamping to break up obvious repeated patterns and I like the result.
Is it a coincidence that coot rhymes with cute?

One more thing before I wrap this up. I should have included this with the first tutorial, but better late than never –
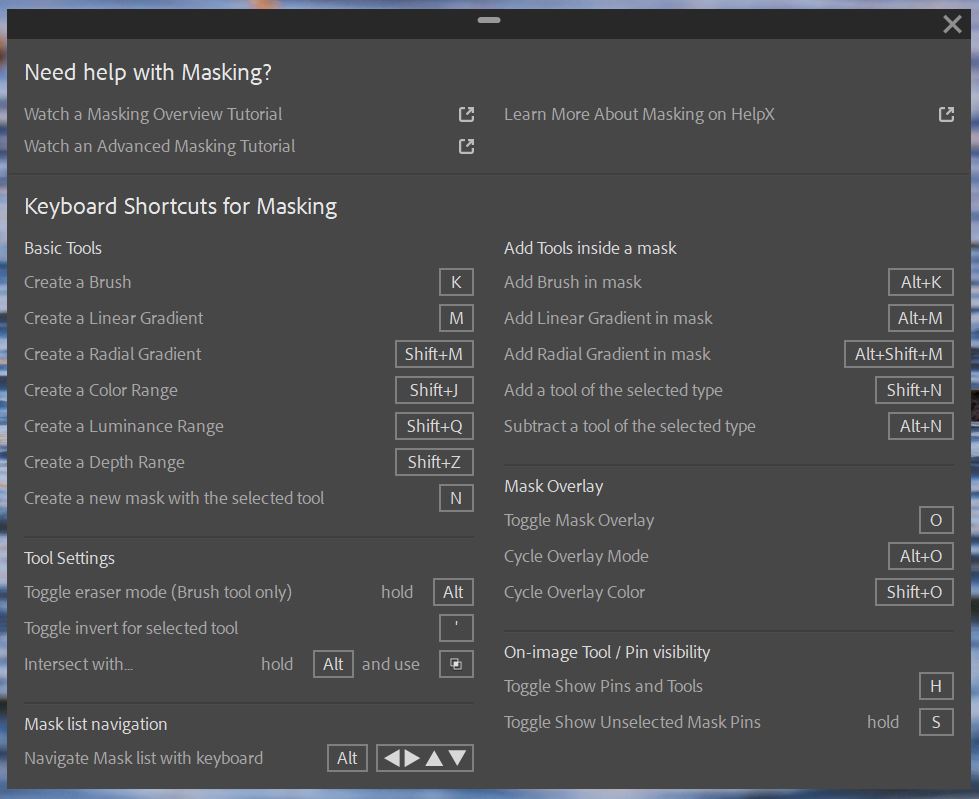
Isn’t that great? Open it by clicking on the ? button at the top of the Mask Panel. If you scroll up and look at the Color Range refine slider image you’ll see it has a Learn More link that goes to Adobe’s main page about the new Masking tools >> https://helpx.adobe.com/lightroom-classic/help/masking.html
So that’s it for the moment. Next up will be Select Sky and all the cool stuff you can do with that.
