
So. Much. Fall.
That’s what you’ll get in this post. Glorious trees. Fallen leaves. Trail shots. Dappled sunlight. All done on a 3.5 mile walk around Wood Lake. I mean the one near Rib Lake in north-central Wisconsin. There are other Wood Lakes in other counties. The trail that rings the lake contains a bit of the Ice Age Trail, but it eventually forks away to the right and you continue left to make a complete circuit. It has a few hills, a stream, information signs about the logging activity that went on here, and gorgeous boardwalks –

Nothing new here, but damn was this ever a perfect day to be out. The colors were rich. The air was warm (high 70s). The bugs non-existent. The sun…well a little too direct. I hoped for more filtering clouds, but I made do. In some ways waiting for those clouds was a bonus – I got to just sit and take it all in.

While the scenery or my style with fall photography is still the same, I used the updated local adjustment tools in Lightroom that came with version 11. I’ve heard a few folks are hesitant to upgrade and use these tools, but honestly they’re worth figuring out. I hope no one minds that I’m going to wrap some tutorial stuff into this post.
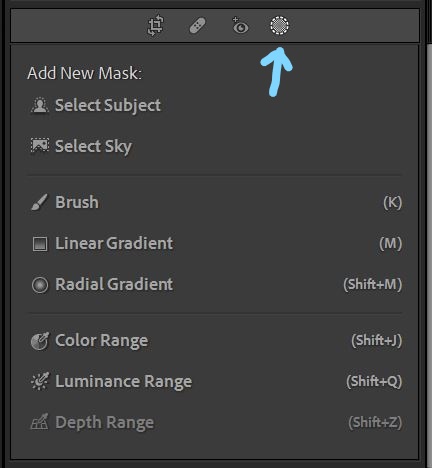
The local adjustment tools themselves haven’t changed – you still have a Linear Gradient, the Brush and a Radial Gradient, but instead of having them each activated by a separate button, they are collected under a single button that brings up the Mask Selection box. This is where the cool stuff hangs out.
The improved power in these tools can help keep your workflow simpler. We can now Select Sky and Select Subject in a similar way to Photoshop and it works really well. Select Sky is particularly nice since you can adjust the selection to finesse the sky in a tree line. Another bit of finesse you can apply is to specify your adjustment with a Color Range or a Luminance Range – basically separating color from brightness in the image to apply changes to them separately. Will it replace the finely-tuned Luminosity Masking in Photoshop? No, it won’t. It’s not that granular and it doesn’t operate at a pixel level, but it is darn good.
For a lot of the photos you see here, I wanted to apply an effect only to bright areas or to shadows, irrespective of the color value of that area. The reverse was also a factor – I wanted to change only a certain color or range colors in the photo and not the levels of brightness. Particularly in the first shot with the boardwalk. The light coming in through the trees needed to be tamed, but not for all levels of luminosity – some just the bright areas, leaving the shadows deeper and richer, some the reverse. Instead of using separate brushes in painstaking sessions of painting in exposure, I precisely controlled where the edit was applied by subtracting the parts where I didn’t want it. It just took a few clicks and messing with a slider.
Like Photoshop panels, the Mask panel can be separated from the rest of the develop panels on the left, or nested inside like all the others. I mostly have it floating and move it around depending on where I’m applying an edit so it won’t be in the way. Maybe it’s the term Mask that is putting people off and maybe Adobe should have picked something else. In a sense, yes they are Masks because you apply them specifically to either certain areas or to certain attributes in the photo, but they could easily be Targeted, Selected or Local Adjustments because that’s what they are.

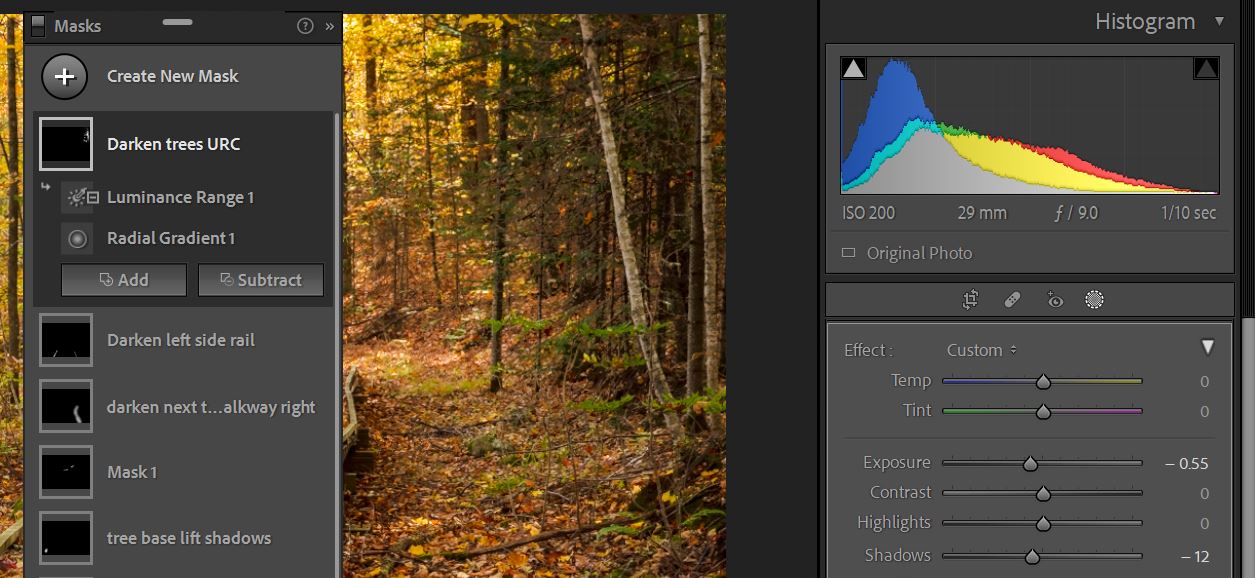
That list shows all of the Local Adjustments I used for the second boardwalk shot. You can label them if you want, but the Mask icon shows pretty well where the edit is placed so I don’t always label since it’s obvious to me. If you have the Show Overlay function turned off as I do, the overlay will appear when you mouse over the Mask label in the list or when you mouse over the pin in the photo itself. My overlay is the default red, but you can change that by right clicking on the … to the right of the color box. I like it turned off since I can see an edit’s effect more clearly. And speaking of an edit’s effect, take a look at this set of before and after screen grabs –

In the first one you can see I’ve applied a Radial Gradient to lower exposure to that section of trees, but it’s affecting all of the space inside the Gradient selection (the pin is the center of it). I don’t want that, I only want to pull the darker areas down, leaving the lighter parts to show the sun shining through the branches. The easiest way to isolate a specific tonal value or range of values is to click the Subtract button below the Mask and choose Luminance Range.

Now I can tell tell the Mask which tones I want to Subtract from the edit to lower exposure – in this case the lighter tones – by sliding the range indicator into the lighter end subtracting them from the edit and protecting them from changes.
Now if I click the Luminance Range back on, you can see the lighter parts of the trees aren’t affected by the reduced exposure. The darkened trunks stand out more against the sun coming through and it adds a bit of subtle drama. Notice that the Luminance Range label has a tiny square with a – inside it – that indicates that you used the Subtract function to create this refinement (it also indicates you used Insect with, but there is one other thing to indicate that, see below). Oddly the Add function doesn’t put anything next to the label. Probably because it doesn’t restrict the Mask in any way and is basically normal. You would use it if Select Subject didn’t grab everything on its own.
You could try a Mask Intersection to do this if you wanted to, but it’s much less intuitive to me. Choose the type of Mask then hover over the Label and click the … next to it to bring up the sub-menu – Intersect With is there. Because of the way the underlying math works with a Mask Intersection, the panel automatically checks the Invert box and it can look very strange as you do the edits if you don’t keep the Mask Inverted. Here is how it looks with a Luminance Range selected with the Intersect option –

It’s the same as plain Subtract, but with the Invert box checked. Control your Range selection the same as above.
But my feeling with the Intersect tool is that it is more useful to isolate a single aspect to include in an adjustment to a localized area. Say to change a color of an object. It seems to work like a Venn Diagram. Clearly this needs more experimentation, but keep reading and you’ll see what I mean.
This next screen shot points to the new Smoothing slider that will basically determine the bleed level of your adjustment. It smooths the transition of your edit into the areas you’ve Subtracted – position it closer to the Range box for less reach into the Subtracted value. You can use this same handle to expand or contract the Luminance selection – sliding it until it touches and moves the Range box will contract your Luminance selection, drag it away and it becomes the smoother as described above. Click the small circle to drag the entire selected range. The Smoothing grab handles move independently of the Range box handle and can be used together to select and blend your adjustment more naturally.

Was that too much? I know not everyone who reads this (all 10 of you, lol) uses Lightroom, but I think many do so I thought I’d dive under a little. Back to fall and more boardwalks around Wood Lake –
This is another one that needed careful tonal management through Local Adjustments. I hope it doesn’t look to fake or over-processed, something I’m kind of sensitive about after my Luminar phase.

Sometimes even without boardwalks the light was just so yummy I had to stop and drink it in about every 20 feet. Wood Lake is far enough from the main highway to feel more isolated than it is and the quiet is magical. This is my favorite time in autumn; when the leaves have mostly changed, but there is still green in grass, ferns and other small plants. The contrast is so rich.


These birch trees stopped me in my tracks. The terrain was slightly hilly and I spent some time climbing up and out of the trail to see if there was a better shot. There wasn’t. Don’t you just want to step into this one?

I do love a trail shot. There are more, but here’s some info on a way I used Intersect With option to refine a Mask instead of Subtract.
This adjustment needed some careful refinement to make the Mask work the way I wanted and quite frankly, I thought I’d have to jump into Photoshop to do it. Nope. See that little green oak on the right toward the middle? I wanted it to show up more against the trunks and foliage behind it. Here’s what I did –


First selected a Radial Gradient and positioned it over the leaves in the tree. Then I right clicked on the Mask to Intersect with Color Range and then used the eye-dropper tool to pick out the green of the leaves. Now my increased exposure adjustment is only affecting the green in the tree, not the trunks or the golden leaves behind. I thought that it was a little strong in the green grass behind so I activated a Brush tool and took the exposure down just a little there. Now the tree stands out! I have no idea how I’d get that done in Lightroom without the new Masking tools.


Dappled sunlight in the woods dazzles the eye and makes you glad to be alive. I hope these photos have brought a little of that to you and maybe convinced you that the new Lightroom tools aren’t just hype. Yes, I did run these into Photoshop for some things that can’t be done in Lightroom, but mostly I kept things in the RAW editor and managed the great range of light and darks to bring the beauty and the special magic of fall long after it faded from the landscape.

