
A few years ago, after using a trackball mouse for all my editing for over a decade, I decided to try a pen tablet instead. Wacom is the leader in these devices so I went for one of their more basic models to try out. I chose the small Intuos with Bluetooth and a dash of Pistachio green. Here’s a photo I snagged of the web –

Most people work at a desk to do editing, but I don’t and so I chose a small unit that I could place next to me on the couch – either the cushion or the wide arm depending on where I’m sitting. My body doesn’t do well having my legs under me for long periods; it’s better if I elevate my feet and I haven’t figured out how to make a desk set up do that. The small size of the Intuos works well – the whole thing is only about 8×6 inches with the active pen area being about 4×6 inches.
Mostly I used it wirelessly which has been more reliable on the MacBook than it was on the Lenovo. It was Windows services that kept having to be restarted – even when I just connected it (oh no Windows, I just plugged that in for the fun of it, not because I wanted to use it!). The driver itself has been fine on the Mac and I don’t have any bluetooth conflicts or need to restart it once plugged in. Even when using AirPods and a Logitech trackball and/or keyboard at the same time everything is fine. There is a battery indicator in the top menu bar that’s handy, but usually I just plug it into the USB port when the light flashes indicating low battery status. It gives plenty of warning so I don’t get interrupted mid-task.
Since it seemed pretty feature-rich and functional I thought that if I liked the experience of using one, I’d be able to use it for years without needing to upgrade, and I have. Plus it was priced at about $100 (well under when there’s a sale) so that if I didn’t like using it, I wouldn’t be out big bucks. I didn’t need to worry though, it’s been the best tool for editing, especially for anything involving brushes. At first that was primarily Photoshop, but as Lightroom’s masking tools have become more sophisticated, the fine precision of a tablet has become more important to me.
But like anything, lately I wondered if I should upgrade to one of Wacom’s Pro models or even try a competing brand with more bells and whistles. Things like enhanced pen pressure sensitivity, more buttons and dials and the ability to switch out the pen surface are all things my more basic Intuos doesn’t have and can’t be upgraded to include.
But do I need them? After some improvements to my current set up and perusing some reviews and comparisons to the Intuos Pro and other brands, the answer is no. At least for now. I’m happy with what this unit delivers and don’t need more. Some of the biggest complaints I saw raised about this model were about how the pen feels (it’s fine to me) and driver problems (which I don’t have). I also don’t mind where the function buttons are and I think that’s because I don’t use it on a desk.
It was during my search for set up, customization and review information that I realized most of the content out there, at least for photographers, concerns the Pro models from Wacom. This might have contributed to my feeling that I wasn’t using the right tool for the job and so putting this post together might help some folks choose their first tablet or feel better about the entry-level Intuos.
There are two ways you can customize the tablet for each application you use. Although I could use it for other apps, so far it’s only Lightroom and Photoshop. Here’s how that looks –
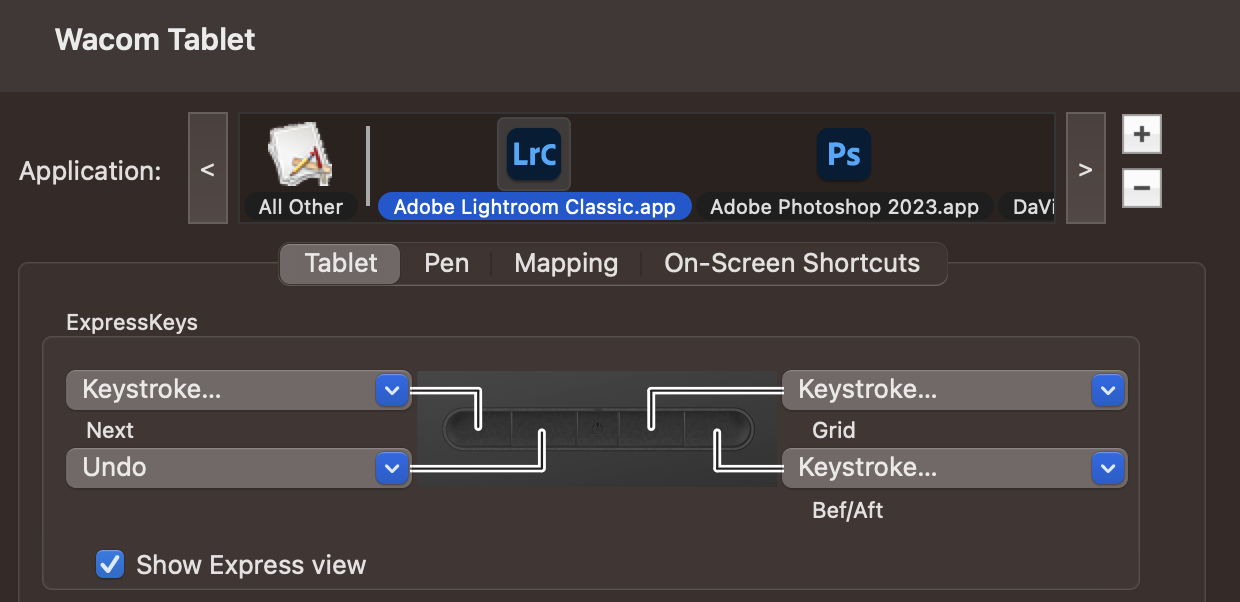
Above are the button assignments for Lightroom – Next image, Undo, Grid view, Before/After toggle. This next one is for the pen buttons –
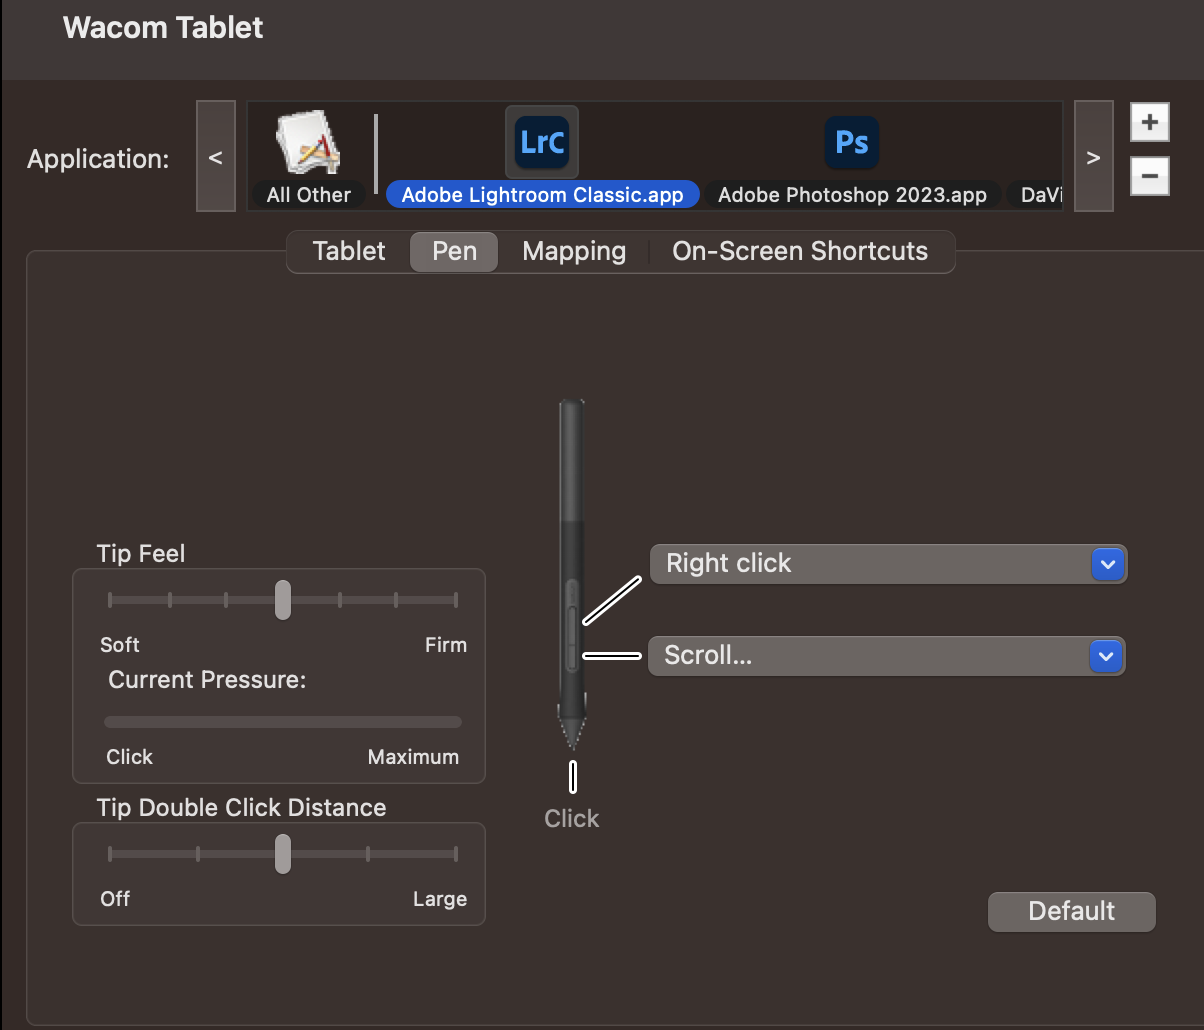
I may change out scroll since I’m not getting the hang of it, but I really need to analyze what I do that involves a lot of keystrokes. Since I already use a lot of keyboard shortcuts with Lightroom like E for the Library view and R for Crop, there isn’t all that much I can’t do quickly.
And now Photoshop –

I’ve left the default set up, but I might change it. The TK8 and 9 panels have made so many things easy in Photoshop that using lots of hotkeys just isn’t necessary anymore. What I have changed are the pen button settings – right click gets me to the brush size panel quickly and I don’t need to use the left and right bracket keys as much. Having the zoom on the other button saves a lot of time, too and has more variability in terms of size than using the Command + or – buttons.

Lightroom doesn’t support pen pressure at the moment, but Photoshop always has. If you use a mouse or trackpad for editing you may not be aware of this function that goes along with brush settings and control. It’s found on the top tool modification strip –

That little pen circle icon between opacity and flow is what you want – turn that on and if your opacity is at 100%, you have to press quite hard to get that level. Moving the opacity % lower just means that the maximum pressure on the pen will be whatever the maximum you’ve set. You can also adjust the pen sensitivity in the Wacom control center. The airbrush effect tool between Flow and Smoothing works as advertised – that is to build up an effect slowly with multiple brush strokes. I’ve never used it, but have used low opacity brushes one after the other to achieve a similar effect. The angle adjustment doesn’t have any noticeable difference on my edits and I don’t have the other pen control to the far right turned on either. That one adjusts the brush size with pressure and I prefer using other ways to manage that. The butterfly on the far right is for mirror control of the brushes, something cool for artists, but not especially useful for photographers. Open a blank document with a colored brush and play with it to see what it does. It’s kind of fun in a way.
Once you get the feel for how pen pressure affects the amount of an effect you’re using like dodging and burning, it becomes second nature. My research into pen pressure sensitivity helped me feel good about the 4000-ish levels in the Intuos. The Pro models have double, but the type of adjustment and retouching I do with photos doesn’t need anything like that. It all has to do with smoothing and how the gradations from one level to the other look. Playing with brushes and a blank document for a few minutes showed that what I have is more than enough. Nothing was jagged or blotchy and so I’m sure the change I made on photos were as good as they can be.
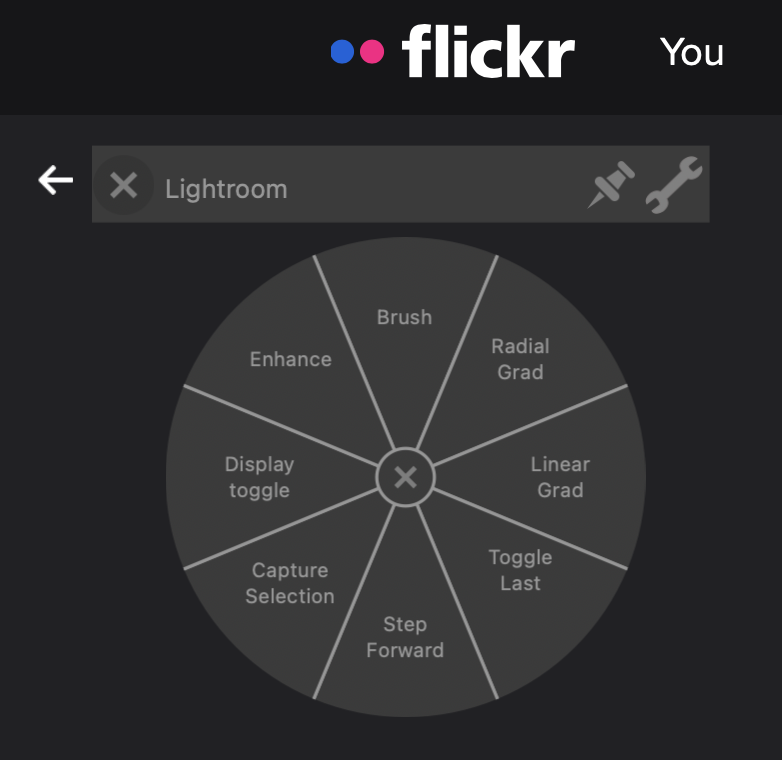
There is one other thing you can use to make things easier with a pen and that’s the On Screen Controls. Like with button customization, you get to these in the Wacom Center app and it looks like this – the tool is in gray on the top left and the customizer is the white circle in the center.

It’s only partly populated with some masking tool shortcuts and I’m not sure I’m going to go forward with it since when deployed it is persistent across applications. It can be pinned in place, but what’s good for say your browser window might not be good for Photoshop or whatever.
So for me it probably won’t be something I use, but it’s there and you can make as many wheels as you like and there is also an option to use a grid of 8 keys that are useful for a handheld screen like an iPad. Just pin them to the side for whichever hand feels right for them.
After all my research, I’m feeling pretty good about my tablet. If you are thinking about getting a tablet, but are unsure about a lower-priced model, I hope my quick assessment of the Intuos BT was helpful.
Just after I wrote this post and well before I scheduled it to go live, Wacom came out with updates to its line of pen tablets helpfully called Wacom One because One by Wacom was just the bomb. Confused yet? I was. After a bit of searching here’s a quick comparison of the Small versions –
Intuos
- Pen loop on top
- Comes with pen
- 4 function buttons
- Bundled software
- Higher price point
- USB A w/BT models
- 4000+/- pressure points
- 6″ x 3.7″ active area
- No pen tilt support
One by Wacom
- Pen loop on side
- Comes with pen
- No function buttons
- Trial bundled software
- Lowest price point
- No Bluetooth option
- 2000+/- pressure points
- 6″ x 3.7″ active area
- No pen tilt support
Wacom One
- Pen loop on top
- Pen not included
- No function buttons
- Trial bundled software
- Higher price point
- Bluetooth & USB C
- 4000+/- pressure points
- 6″ x 3.7″ active area
- 60° Pen Tilt support
There are bundles available at retailers, but purchasing directly from Wacom for the new Wacom One products forces you to choose pens, cables and other things like cases. The website says that this is all in the name of allowing you free-spirited artists to customize your pen tablet, but it is confusing and the base prices of $59.95 a bit misleading especially since it appears you can’t buy one without those other items. That strikes me as weird since maybe folks already have pens and cables. There isn’t any information about compatibility between older models for those which is irritating.
At the time of writing (August 2023) there looks to be heavy discounting of the Intuos wired models with the Bluetooth models holding at about $100 from Wacom, but less at retailers. A bundle including pen and cable for the Wacom One S is $100 at retailers.
So do I still feel the same about my small, pistachio-green Intuos? Yes I do. The only difference I see in the Wacom One is the pen tilt support, something I don’t need. Oh and a native USB C connector, but since I have a USB hub and an adapter for the port on the MacBook, I can manage. Plus I use the function buttons so I’d miss them.
Oh, and one other caveat that has cropped up this fall concerns the Mac OS update v14 (Sonoma). It seems that weeks after it went live, Wacom still hasn’t provided a specific driver for this new OS (website link here). I haven’t seen a wave of complaints and angry photographers waving pitchforks and torches, but it does give me pause and I haven’t yet upgraded because I don’t want to lose the use of my arm. Ha, no. It does feel a bit like that though. Any serious editing I do is with the tablet, so come on Wacom, wake up!
UPDATE –
Wacom has released a driver for Sonoma as of October 20, 2023. I have installed it on my Ventura machine and it was a bit flaky with the driver shutting itself off in the middle of working with the tablet. I had to keep the Wacom app open and hit the restart driver button a couple of times. Reminded me of having to restart the services for it when I had a Windows machine. Ugh. I hope when I update the OS it works more reliably.
So that’s it. Hope it was helpful or at least mildly interesting.

Thanks for the review. I agree, my model does everything I need it to for editing. No need to spend money on features I won’t use just to say it has them. It’s probably time I dig mine out to learn new things over the winter.
You’re welcome. Glad it inspired you to dig yours out of storage.
Very useful review, thank you for sharing your pretty exhaustive overview. I’m probably tje only photographer at this point who doesn’t use Lightroom but it should be a boon with Photoshop and the slim size that fits while I work from the couch or recliner is perfect. Thank you.
Glad you found it helpful. A pen tablet is probably going to be useful with any editing app, but especially those with pressure functionality as it relates to tablets. I know a lot of video editors use one as well, but I haven’t gone that far with it. For editing past a rough cut I am at a desk because it has a really big monitor on it.