You know how much I love a Custom Mode, but a few things have been added and improved on in the G9 M2 when it comes to customization so I thought I’d do a deeper dive to cover those as well as my current set up. These additions may have come with other Lumix models, but this is my first time encountering them –
- Double the number of modes from 5 to 10
- The ability to name each one with something that makes sense
- The ability to preserve adjustments made during a shoot when camera sleeps
- The ability to override or ignore certain parameters baked into the mode settings
If you think of a Custom mode as a recipe it might help. You always make your chocolate chip cookies the same way, but (gasp!) you go to a friend’s house and she doesn’t have chocolate chips – she has the dreaded carob chips. But you make do and bake the evil cookies anyway. That’s a temporary (and unfortunate) substitution that you have to do just once (until she can be deprogrammed).
In the field I often use my Wildlife mode, but change things like shutter speed and white balance. My choice comes down four things for how the Custom mode operates –
- Register or ignore f-stop, shutter speed, ISO and white balance when creating mode (recipe)
- Restore original settings during sleep, power off or change of mode (recipe)
- Change original settings for one session, but not forever (substitution)
- Change original settings with every session (substitution becomes part of the new recipe – it’s like an auto update)
Set up your Custom mode in the normal way and then decide how you want it to behave here (click to enlarge the picture) –

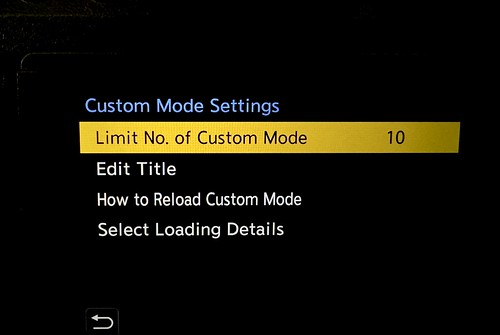

Looking at the last picture you can see that I have it set so that changes I make on the fly will stick if I switch to another camera mode or if it goes to sleep, but not if I turn it off (temporary substitution). Turning off and on will restore the original Custom settings (the recipe).
When it comes to creating recipe for the Custom mode, I can decide whether I want certain aspects of those settings to be recorded permanently or not and this is where you do it – Go back to Custom Mode settings and then to Select Loading Details (sorry it’s not highlighted) –

Then decide whether you want those settings to be a permanent part of the Custom mode. If you do that’s what snaps back when you select that mode. If you turn them off, those settings will revert to whatever you used the last time you were in that mode. It’s ONLY those parameters in the menu however, anything like metering mode, photo style or file type will not change. Clear as mud, right?
It is a bit to wrap your brain around, but in a practical sense it is fluid and can be adapted to many shooting styles. Let’s say you do a lot of street photography and know that you want the Leica Monochrome profile, Multi metering and Human detection, but you know that lighting conditions are going to change every time you go out to shoot. You’re going to have to change shutter and aperture every time, so it really doesn’t matter if they are baked into your recipe or not. Leaving them ON in the Select Loading Details menu is the right choice since it now LOADS those details into your Custom mode. Multi metering, Human detection and Leica Monochrome will always load.
Conversely if you’re a nature photographer that occasionally shoots wildlife (ahem) and you have your camera on a tripod when suddenly a bear comes out of the trees across the river. You want to snap to your Wildlife Custom mode and instantly know you have a reasonable shutter speed and ISO so you can probably get one shot before it sees you and scarpers. That’s when you want to GUARANTEE you’re getting that and so telling the camera to ignore any previous setting in that mode is the way to go. You’d turn F/SS/ISO OFF in the Select Loading Details menu and it will ignore those temporary settings and LOAD your original mode as you set it up.
One more new thing is that you can label each mode so you know what it’s for. Go to Custom Mode Settings and Edit Title –


You can cycle through various keyboards and then edit away using the old-school texting method of three presses to get an L, etc. I have my three most important and widely different modes set on the dial and the rest in the menu when I have more leisure to find and set them.
Phew! Now to my settings so far. There are many ways to customize a camera these days, but my method is doing it by subject or condition of shooting.
You may notice that I listed i.Dynamic in the settings and that’s because the M2 has changed the way this works to give better results. The original was pretty much always set to Auto since that’s the default. Panasonic now talks about Dynamic Range Boost which processes images using two separate gain sensors; one for high which reduces noise in dark areas, and one for low gain which protects color in highlights. Those are combined into a single image, which, as you imagine, relies heavily on sensor read-out speeds. For video this is 60fps and lower, and for stills the only limitations come with the electronic shutter so far as I can find. Those are using higher than 20fps burst or slower than 1 second at any ISO under 800. Oh which reminds me, the electronic shutter can now be timed up to 60 seconds or bulb. The M1 electronic shutter maxes out at 1 second.
Looks like the default in the M2 is Standard so I left it there, but have also noticed that in some situations shots are noisier than they were in the M1. Not drastically, but I didn’t expect that so did some investigation and I wonder if it could be due to the new i.Dynamic default setting. I will do some playing with it in the field to see if it makes a difference with the same scene/settings. I’m going on the assumption that changing those settings will change how Dynamic Range Boost works when it’s active.
C1 Tripod
- Aperture priority
- f/4
- Natural photo style
- 1-area focus – Set 1
- Center-weighted metering
- ISO 100
- Auto WB
- i.Dynamic standard
- 2-second shutter delay
- Exposure compensation + 1/3
C2 Handheld
- Aperture priority
- f/7.1
- Landscape photo style
- All points focus – Set 1
- Multi metering
- Auto ISO & WB
- i.Dynamic standard
- 1/15 minimum shutter speed

I have no idea why I used video for C3-2 and 3, but that’s what I did. I had a non-wildlife kayak set up, but I can probably just use C2. Maybe I won’t need it since I’m planning to take the original G9 as my 2nd body in the boat. See this post to understand my reasons for that.
C3-1 Wildlife
- Shutter Priority
- 1/2000
- Standard photo style
- Sharpening + .5
- Noise Reduction + 1.5
- Animal detection all points
- Center-weighted metering
- Auto ISO & WB
- i.Dynamic standard
- Animal body/eye all points
- Focus Set 3 – factory settings
- Front buttons – near and far focus
C3-4 Jewelry
- Manual mode
- f/4.0 – 1/4 sec
- Vivid Photo style
- Shadows +1
- 1-area focus w/Set 1
- Jpg fine/large
- Multi-metering
- ISO 250
- Auto WB
- i.Dynamic low
So far not all that much has changed, but I have learned a few valuable things from attending Lumix USA’s live streams on YouTube. If you’re not familiar with these it’s a weekly session with a person (Sean) who works for Panasonic’s Lumix division. Basically a sales/marketing position, but he’s a photographer, too. During the sessions a particular topic is discussed, but we can ask questions directly as well. It’s really informative even if the camera under discussion isn’t one I own because a lot of the features and functionality cross over.
Anyway…during the session from yesterday I learned more about customizing the AF Sets and how it wasn’t a good idea to just cut and paste settings from the G9 M1 since the focusing system has changed so much. PDAF works differently and so I’m leaving it on the factory setting for Set 3 which is my wildlife mode. The AF Sensitivity is how well it finds and locks, the AF Switching Sensitivity is how long it stays on one target before finding another and the Moving Object Prediction is how quickly it will react to movement of the subject it’s locked onto. AF Sets are only available in AF-C, btw. Here’s what it is from the factory –

To hear Sean explain this for stills and video Click this YouTube link and go to about an hour and 2 minutes in.
Am trying out a couple of Custom modes for Video so that I don’t have to wade through too many settings to get to the few that I will use – pretty much MOV (Quicktime) 4K with either 420/10-L or 422/10-L and 24, 30 or 60 fps. Am going to shoot in manual and set a white balance, but I may experiment with Auto ISO and see how that looks. Also trying out Like 709 as well as Natural for camera profiles. I don’t like having to mess too much with color grading in video so if I can get decent footage to begin with all the better. Dialing in Slow & Quick settings is fairly straightforward and I can do those pretty easily by having the S&Q button in the Q menu (it’s grayed out if you’re in straight Creative Video).

Anyway…this is how it looks so far and if anything major changes, I’ll do an update like I did with the G9. The customization posts continue to be some of the most popular as they rank well with Google searches for the topic.


Leave a comment