
In my last post, I mentioned that I bought a collapsible diffuser, so I thought I would write to explain how I use it, what the results have been and why I can’t believe I haven’t bought one before.
Part of my not buying one is sheer forgetfulness, but another is that I don’t want to complicate my photography with a lot of gear. Before my old ring flash died I used it sparingly because natural light seems much more complementary to my work than artificial and so you’d think a light reflector/diffuser would be more appealing, but somehow I just made do with my hat or leaves or simply using my body to make my own shade. Adequate, but not flexible and certainly not repeatable with any certainty, I mean, who can find the perfect leafy branch every time you need one?
So here is the little beast –

I included a credit card so you can get an idea of size. It’s very slightly translucent, but completely opaque, made of nylon and has a hard plastic ring sewn into the black piping. If you grasp the edges and twist it will fold down to fit in its case which has a loop for attaching to a carabiner or other handy clip. At first I had a time remembering I had one, but once I started using it, it stayed more out of the bag than in. I do wish I could use it with an articulated arm/clip system I built a couple of years ago, but alas it’s too insubstantial which works for being foldable, but doesn’t leave a large/firm enough edge to grip.
Mostly I use it to diffuse light; that is to create shade or soften shadows. Here are a few examples of how I’ve used it to improve my images.
These are the same chanterelle waxcaps from a previous post. I found them in the woods with the sun almost directly overhead. Oh so harsh and contrasty. They were next to a large pile of boulders, fallen branches and other pointy and squishy stuff I didn’t really want to have to climb around in to make shade with my body (my hat wasn’t wide enough).

So rather than give up and leave these alone, I remembered the diffuser and here’s what I got instead –
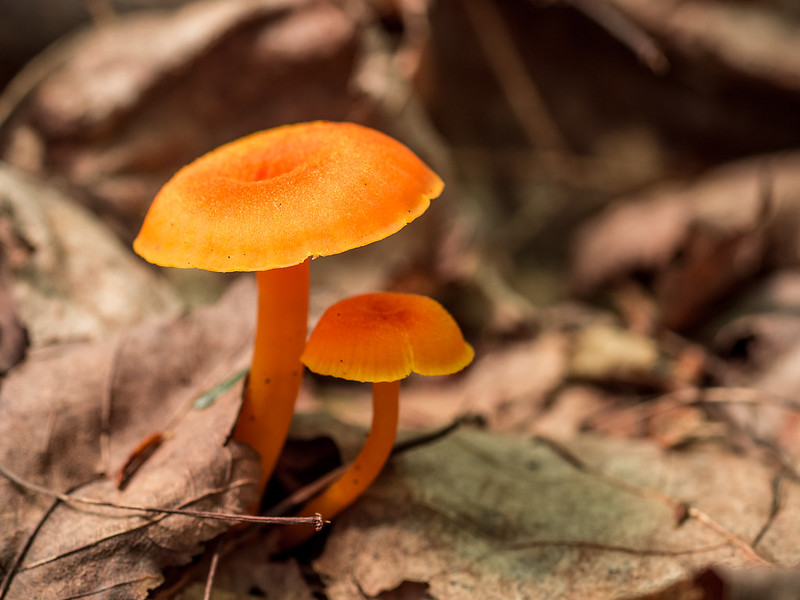
One of the things I love is that the shadows aren’t entirely gone, but they’re controlled and softened. Now, before you think I’ve used some Lightroom sleight-of-hand, the processing values are exactly the same. It’s only the light and the resulting exposure that is different. Notice the color saturation, too. The orange/red/yellow is much, much too hot in the first picture. Just as you can clip whites and blacks, you can clip colors and just like when you clip highs and lows, the information is unrecoverable. The sensor is overloaded and the detail is lost. So is the smaller mushroom.
This isn’t the only image I took with the diffuser. Using the camera’s LCD screen I could watch the effect of the shade as I held it at different angles and distances from the subject. The differences were subtle, but noticeable and I chose what I liked best in the end. Every situation is different and I’m sure I’ll be playing with it more and more. Without a diffuser I would have walked away from that little scene and lost a photo that I really like.
It isn’t direct light on a subject that is always the main problem. Sometimes it’s glare on another element in the shot that makes for a distracting highlight. Take this one as an example. It’s in my backyard where honey mushrooms grow in huge masses at the base of the trees (the deer love them, btw, and snack on them often). We don’t have a lot of red maples around, so when I spied this leaf I knew I’d use it to make the mushrooms stand out. The problem was the afternoon sun. Even with a polarizer there’s glare on the leaf that I find distracting –

The first places your eyes naturally go to in a photograph are the light areas which is why it’s so important to mange those backgrounds and watch for things that can pull the viewers’ eyes away from your main subject. Out came the handy diffuser and voila –

Other than the change in camera position, everything is the same. The glare was still there and the diffuser blocked it really well. This time I angled the thing perpendicular to the ground to block the sun. The red pops as it should and so does the texture and slight yellow tinge of the mushrooms.
Distractions – they’re not helpful at all and sometimes waiting for the light to change just isn’t practical even in a tiny scene where just a couple of minutes of the earth’s rotation will help. Or waiting for cloud cover. What if there are no clouds? Take this next before picture. Sporophytes are some of my favorite things, but they already exist down where there’s a lot going on; shapes, textures, colors – all competing for your attention. So after careful composition to arrange those elements, light patterns can be hard to deal with like they are just behind the sporophyte stems. Irritating.

So the diffuser to the rescue.

Again, other than the change in light, everything is the same. I just copied the processing I did with the second image onto the first so they would compare fairly. This time I angled the diffuser just behind the sporophytes and hotspot be gone!
Fixing this kind of thing is possible in Lightroom and other robust photo editing packages, but it’s much easier to do in the field. So consider getting a diffuser and using it for your macro and close up work. I find it very useful to provide consistent shade that can be manipulated to give you highlights and shadows that bring out the beauty of your subjects.

Leave a comment