
Welcome to the DFC HQ. If you’ve read the introduction page, I’m glad you took the next step. Here’s a little background on why I put this together.
Over the years I’ve written quite a bit about features, custom modes and some ways to make sure you’re getting the most out of your camera, but lately I’ve been toying with the idea playing with film again. I have three film cameras and several lenses so it’s something I can do easily. I even have a local camera store that could handle the processing. If I really wanted to go whole hog I could shoot black and white and develop the negs at home. Now that I found some third-party software for my 20 year old Nikon film scanner, I just might do it. Alas, I have no film at the moment.
So. How could I fake it? How close could my mirrorless camera come to a 35mm film camera? One day I sat and thought about it and came up with a list of changes and customizations you’ll need to make. I’ve saved these fake film settings into my final empty Custom Mode slot.
Get your House in Order
Let’s talk about camera and lens set up and go through the things you’ll need to do to have the most 1990s-like experience. And yes, I know film still exists, but I’m going to use the past tense.
Manual mode
This is your starting point. Putting the decisions in your hands. If you don’t feel entirely comfortable with full manual, you could go with aperture priority. Until cameras became electronic and had full program mode, this was what we had. You probably use this with your digital rig now, but if you really want to stretch, choose manual. Two of the cameras I used for 20 years were manual only, one had aperture priority as well. Two fired the shutter without batteries – the batteries powered the meter only. If the batteries died I could still take pictures, but that meant I had to meter in my head. I used to be able to. Honest.

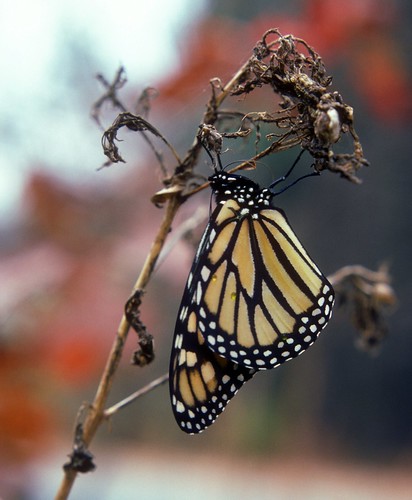
Fuji Provia 100 – Michigan, Lake Superior, 2002
OM-3 & Zuiko 90mm f2, 1/250 at about f5.6
Manual lens
If you have lenses from a 35mm camera use those (you’ll need an adapter). If not, use manual focus. Because focusing screens aren’t what they used to be, I think it’s fair to use focus peaking if you have it or focus confirmation if that’s available. Turn off any feature that enlarges the focus area in the viewfinder. No such thing in film cameras. Even without that you should be able to get sharp shots.
No image stabilization
This goes for any system lens and the camera itself if you have IBIS. With film cameras stabilization starts with your body and proper technique, then a tripod, bracing, or other supports like bean bags and the occasional log or bench. Got a super-telephoto lens? Well you’re going to have to adapt. Shutter speed getting a little low? Figure out how to keep it sharper. There’s plenty on the web about good camera and lens holding technique.
Center-weighted metering
This is the way camera meters operated for decades. Some fancy models had spot metering (and some would hold multiple spots in memory), but that wasn’t usual. Good-old center-weighted metering works about 90% of the time. If your subject isn’t basically in the middle of the frame, use your head and adjust.
Viewfinder only
Film cameras don’t let you see the image until it’s developed. Period. So turn off the screen and even tape it down if you have the type that flips out. That way you don’t inadvertently open it out of habit. I’ve turned off image review in the viewfinder as well (my G9 has an EVF). Once the shutter fires – the image is done and you can’t look at it until you get it in the computer. NO CHEATING and NO DO-OVERS! If you think you got the exposure wrong, shoot it again, but leave the bad one. Both shots count toward your selected “film roll” (more on that shortly).

TMax 400, c. 1990, Dublin, NH OM-1n & Zuiko 24mm f2.8 lens
Constant preview
Turn it off if you have it. Digital cameras (at least mirrorless ones) let you see in different ways. One is to present the scene with the effects of the settings you have dialed in – this is constant preview. The screen goes lighter and darker as you change things. It’s cheating. You don’t want to see the picture yet. Instead you want a constantly bright screen that doesn’t change as you adjust shutter speed and f-stop. Rely on just the meter. When you use a 35mm camera, what you see in the viewfinder is not what you get. At least in terms of exposure. A single-lens-reflex camera (that’s what SLR means) is designed to let you look directly through the lens. When you turn the aperture ring you won’t see it live. What you’re doing is setting the stop – a physical mechanism – a literal stop that the term derives from. When the shutter fires the lens is triggered and will stop closing down at the point you’ve set. Which brings me to…
Depth of field preview
One of the reasons I chose Olympus in the 1980s was because all of their lenses have a button that would close down the lens to show you DOF before you hit the trigger. It’s lovely, but I’m not sure how easy this was to do with other systems like Pentax or Canon. Since I could do it and it’s a common function on modern digital cameras, I’m going to allow it. If you have a DOF preview button (either on your manual lens or in camera), let ‘er rip!

Agfa Vista 100, c. 2001 Fort Frederick, New York – Olympus OM-3, Zuiko 24mm f2.8 lens
Functions & Techniques
Clipping indicators
They’re nice, but turn them off. Ditto your histogram. Neither exists in film photography. Whether it’s blinkies or zebra stripes, they’ve go to go.
Face recognition
Off. Also animal recognition.
In-camera level
Shut it off. I use it continually because I need it and it’s hard going without. With film you had to either use your tripod if it had a bubble gauge, or change out your focusing screen to one with a grid (I did that with my OM-3). That being said, if your camera has a grid overlay for the viewfinder, switch it on to help keep your horizons where they belong.
Bracketing
Go ahead, but only the exposure method. Typically 35mm bracketing used 3 frames of film – one at proper exposure and then one over and under. This was done to ensure you got one that would work, not to merge them, so don’t. The extra frames you use to bracket count toward your exposure total. If you bracket every shot in a 12 roll, you get 4 useable pictures in the end (if you did your job).
Kodachrome 64 – NH, 1986 – OM-G or the OM-1n & Zuiko 135mm f2.8 lens
Shutter action
Speed
If you can, set your maximum shutter speed to be something like 1/1000 of a second for real old school. One of my cameras won’t go faster than that. One will go to 1/2000 sec. I think some of the later 35mm would go to 1/4000 and maybe 1/8000, but those were electronically activated shutters and not mechanical. Since they were all film cameras I think the higher speeds can get a pass, but if you want a challenge, slow it to 1/1000.
Sound
Unless I need to use shutter speeds lower than 1 second, I run my camera with an electronic shutter to keep the noise down. That wasn’t an option with a 35mm film camera – they made a lot of noise, and some of it was beautiful. The sound of a mechanical shutter and mirror is still a joy to me. I wish Panasonic would load the sounds of old cameras as part of the software and let us choose the sound of our favorite vintage rigs. Sigh. Anyway, my camera doesn’t have a mirror so I won’t have that, but I will keep it to the mechanical shutter.
Mirror lock up
Aka shutter delay. In the old days we would use mirror lock up to prevent the vibration of the mirror slapping up from affecting the photo. With mirrorless it’s less of an issue, but I still use a 2-second shutter delay if I’m not using a cable release. This gives the vibrations from my finger on the shutter button a chance to dissipate. Go ahead and use it if you have it.

Unknown slide film, Tredington, England 2005 – OM-3 and possibly the Zuiko 35mm f2
Pick your poison
These next tweaks will determine which “film” you’ll be using. We’ll try to approximate all the limitations that film inherently had. Each kind had a look and a capability that is locked in. Some leaned toward warmer colors, some cooler. Some were geared for low light conditions, some needed bright. Some were negative films, some positive (slides). Some color, some monochrome. They all had distinct grain structures. Digital cameras have freed us from many of those constraints, but it takes skill to work well within them.
JPG only
Or at least RAW + jpg if you want a higher quality file as well, but show the jpg. The idea is to fix the image as much as possible inside the camera the way it was with film. You’ll see what your camera’s computer does with your setting choices. Also, sometimes using creative filters (next) won’t apply to RAW files except as a side car file and that’s a pain.

Ektachrome – Washington, 2006, Olympus OM-3 – either the Zuiko 24mm f2.8 or the 35mm f2.
Fixed photo style or creative filter
Pick a style you like and leave it there. Most people don’t change this often (if ever) so it’s not such a big deal, but the idea is to limit the output to a specific look. Because there was a thing called photo finishing (you know, printing), I suggest using a creative filter, too. For camera/photo styles I think leaving it in standard or natural will work. Creative filters go further and actually apply edits or special effects to the jpg file – I have one that mimics bright sun sort of bursting in through the background. I think that some Fuji cameras have modes that mimic Fuji film types – now that sounds fun! Whatever you choose – leave it there. Like film, once you load it, you can’t change it. If you chose a monochrome filter – you can’t switch to color just because you have an amazing sunset.*
Fixed ISO
This is very important – you couldn’t, and still can’t, change your film’s light sensitivity. If you loaded Kodachrome 64 and suddenly you were in dim light, well, you had to deal with it. If you came across some beautiful flowers and wanted to do some close ups with creamy bokeh (wide open lens) and had 1000 speed film loaded, well you’d have to manage the grain. It was all compromise based on non-changeable parameters. For added verisimilitude stick to ISO settings that equate to real film – 25, 64, 100, 125 (B&W), 160 (color), 200, 400, 800 & 1000 were commonly used. Heaven help you if you forgot to change the setting on the camera if you loaded something else. Some cameras had little frames on the back to hold the end flap from your film box to remind you what you had in there.
Fixed White Balance
Believe it or not, film was calibrated to a particular kind of light. Most of it was daylight – about 5500 Kelvin, because most people were taking pictures outside. But manufacturers made other films like some for indoor use that were calibrated for incandescent lighting, about 7000 Kelvin. If you shot outdoor film inside without a flash, the resulting pictures were VERY warm and strange looking. A good tech could correct for this when making your prints, but often it was ignored. Now we can switch from sunny to shady to fluorescent on the fly and auto WB works pretty well for most – but turn it off, pick a value and leave it.

Sunapee, NH c. early 2000s
Unknown print film – Olympus OM-1n, the Zuiko 35mm f2 or 24mm f2.8 on a tripod.
Fixed image count
For a real challenge, pretend you only have one roll with you. Or if you really want to be a nut, stop part way through a second roll and DON’T include those files in your import to your computer (don’t even look at them). Count off the number of exposures in your roll and leave the rest. That happened all the time with film. You’d start with the birthday party for a few frames, then sometimes months later there would be your trip to New York City and some random shot of your cat. Film was limited – if you loaded a 24 exposure roll and didn’t have more – that was it. If you didn’t use it all at once, you had to wait until you did to see the photos or sacrifice the remaining blank film. So decide if you want to give yourself some leeway with a 36 roll or a real tight spot with a 12. Those were the choices – 12, 24 or 36. It forces you to be VERY choosy when evaluating a scene. Do you REALLY need this shot? Is there a better composition? Should you save frames for later today? What if something awesome comes along and you’re out of film? Good times.
Fixed Aspect ratio
This may not apply to you, but it does me. I shoot Micro four-thirds which is a 4:3 aspect ratio. 35mm film’s aspect ratio is 3:2. So if you’re camera doesn’t natively shoot that way, change it. If you want an even bigger challenge shoot in 1:1. Square format is lovely and was a standard way before the 35mm camera.

Zaphod in a drawer
TMax 400 – 1988, – Olympus OM-G (yes, it really was called that) & the Zuiko 50mm f1.8 lens.
No editing
Unless you had access to a good darkroom and had skills, the picture you got was the picture you got. You couldn’t tone down the highlights if they were blown out. You couldn’t add contrast. You couldn’t sharpen things up a bit if your focus wasn’t crisp. You couldn’t dial down the blue/cool tones and make it warmer. You cropped with your feet (move closer!!!) or a zoom lens. Some digital folks like to shoot SOOC – straight out of the camera – give it a go. Dialing in JPG and creative filter settings will give you the look you want, but then leave it. Also make sure you’re not overriding your camera settings with your editing software. Lightroom has camera simulation modes just above the Basic panel and you can match your camera as part of your import settings. If you don’t want to do that, override the default by choosing the correct camera simulation that matches what you used in the field. See how good you got things in camera.**
Accessories
For this exercise I dug out some of the things I used with film –
Filters
Not just a polarizer, but how about a graduated neutral density? Yup, until Adobe added a graduated filter setting in the software, if you wanted to darken your sky, but not your foreground, a filter was the only way to do it. And you had to have a few of them to get the exposure right. So using them is fine. What if you wanted a sepia look? Filter. Wanted to warm up or soften skin for portraits? Filters. More dramatic skies in black and white? Filter. So if you got ’em, use ’em. I have both screw on and square holder types, so that’s what I’ll use.
Lens Hoods
Good to go – all the lenses in my 35mm kit, apart from one, had hoods. I think that was pretty much the norm.
Supports
Of course use a tripod. Beanbag, GorillaPod, whatever you need, use it. Ditto cable release.
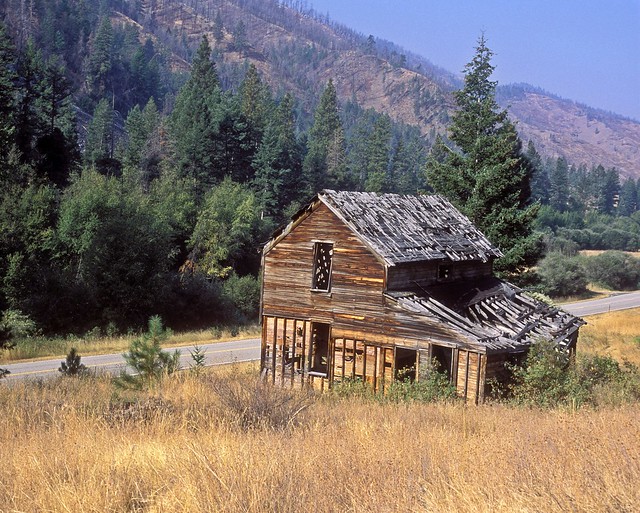
Unknown slide film, 2005, Montana outside Hamilton, OM-3 + Zuiko 35mm f2
Burst mode
Use it, but dial it back to something film could approximate. Four to eight frames a second was about all 35mm users could expect, and it didn’t exist in large or medium format. So if you typically photograph your daughter’s soccer game in 20 or 30-frame burst, use the slowest setting your camera allows.
Spot meter
This is a gray area. Ha! I have a film camera with a pretty sophisticated meter – it handles a maximum of 8 spots in memory and then also can weight the exposure to Highlights or Shadows (over or under exposing). It’s pretty nifty, but pretty rare. If you’re familiar with spot metering and use it regularly, I think that’s ok. If not ignore it since your imaginary film camera probably didn’t have it.
Flash
If you have one, use it, but with all of these other settings in place. Later 35mm cameras had TTL (through the lens) metering for flash so that’s a go. They didn’t, for the most part, have pop-up flashes. If that’s the only thing you have and you want to use it, I think it gets a pass. Just.

Unknown slide film, Tower of London, 2005 – OM-3 (or possibly OM-1n) & Zuiko 24mm f2.8
* A word on changing film
So I have said, repeatedly, that once you load your camera, you can’t change it. That’s not entirely accurate. You could, but it was a pain and a lot of time you sacrificed some, or all of, the unexposed film from the roll you took out depending on whether you couldn’t reload it. Loading and unloading film was a fiddly process and a lot of it was done by feel. You had to catch the holes in the film on the spindles and feel the tension as you advanced the frames. You also had to watch the rewind knob to make sure it was revolving every time you advanced the film with the lever (if it wasn’t, your film wasn’t loaded). Once you release the sprockets inside and prepare to rewind, you’re pretty much committed. Rewinding generally caused the film leader to get sucked back inside the canister. You need a specialized tool to get it out again. If you managed to do that you’d have to advance the film to a frame or two beyond where you left off (providing you remember or wrote it down). You do this the normal way, with the shutter, but with the lens cap on. So that’s why when you loaded your camera, you were pretty much stuck with it.
The two-body approach
So now you know why you often saw professional photographers laden with two or more camera bodies. I shot this way for years. One was for black and white. One for color. One for fast film. One for slow. One for print film. One for slide film. One had a telephoto. One a wide-angle. If you have multiple cameras and want to bring them with you dialed into different “film types” have at it! Just make sure the rest of the film camera experience is good to go.
** A Word on photo finishing
In the late 1980s and early 1990s I worked in photo retail and had experience working in and running 1-hour photo labs. These machines could correct for basic exposure mistakes if, and I mean IF, the technician noticed, cared and knew how to fix them. Running the film strip through the printer on auto mean that every single photo got the same amount of light going through it to make the print. No corrections were made for crossed lighting conditions or any other error unless the tech did it. That was why it was wise to bribe make friends with your local 1-hour lab operator.
And further, if you had a good lab for enlargements and they had more services than just the standard print, you could get things cropped, enlarged, burned, dodge and all manner of darkroom magic applied, but that’s not what we’re talking about for this. The Digital Film Challenge is about film and the joys and frustrations of working with it and how critical decisions about composition, framing, exposure and focus became when there was basically no way to fix it if you goofed.
Let me explain…
No, there is too much. Let me sum up.
Yes, I realize we will all have the safety net of still using a digital camera. My memory cards are enormous and I can turn on or off any feature I want. I could do some illicit editing and show you those photos, but I’m going to stick to the program. Why? To slow down. To see if I’ve ‘still got it’. That’s really what this is all about. Often times I’m just snapping away, trying a million different things and letting the camera decide a lot of what’s going into the photo. All knowing I’ll edit to get my finished product. Mostly this is fine, but if you really want to practice slow photography I think this is a viable approach.
Maybe you don’t want to start with your Once in a Lifetime vacation or when that unicorn finally emerges from the forest, but give it a go with something that is important. A subject you love or a location you feel connected to. The experience is the valuable part of this, not just the final images.

Kodachrome 64 – Rye, NH, 1991 – Beach rose, probably OM-1n & Zuiko 50mm f1.8, on a tripod.
Please share links to any images you shot this way. I have a section set up HERE that I’ll be posting my “film rolls” to, warts and all.
And mostly have fun.
